


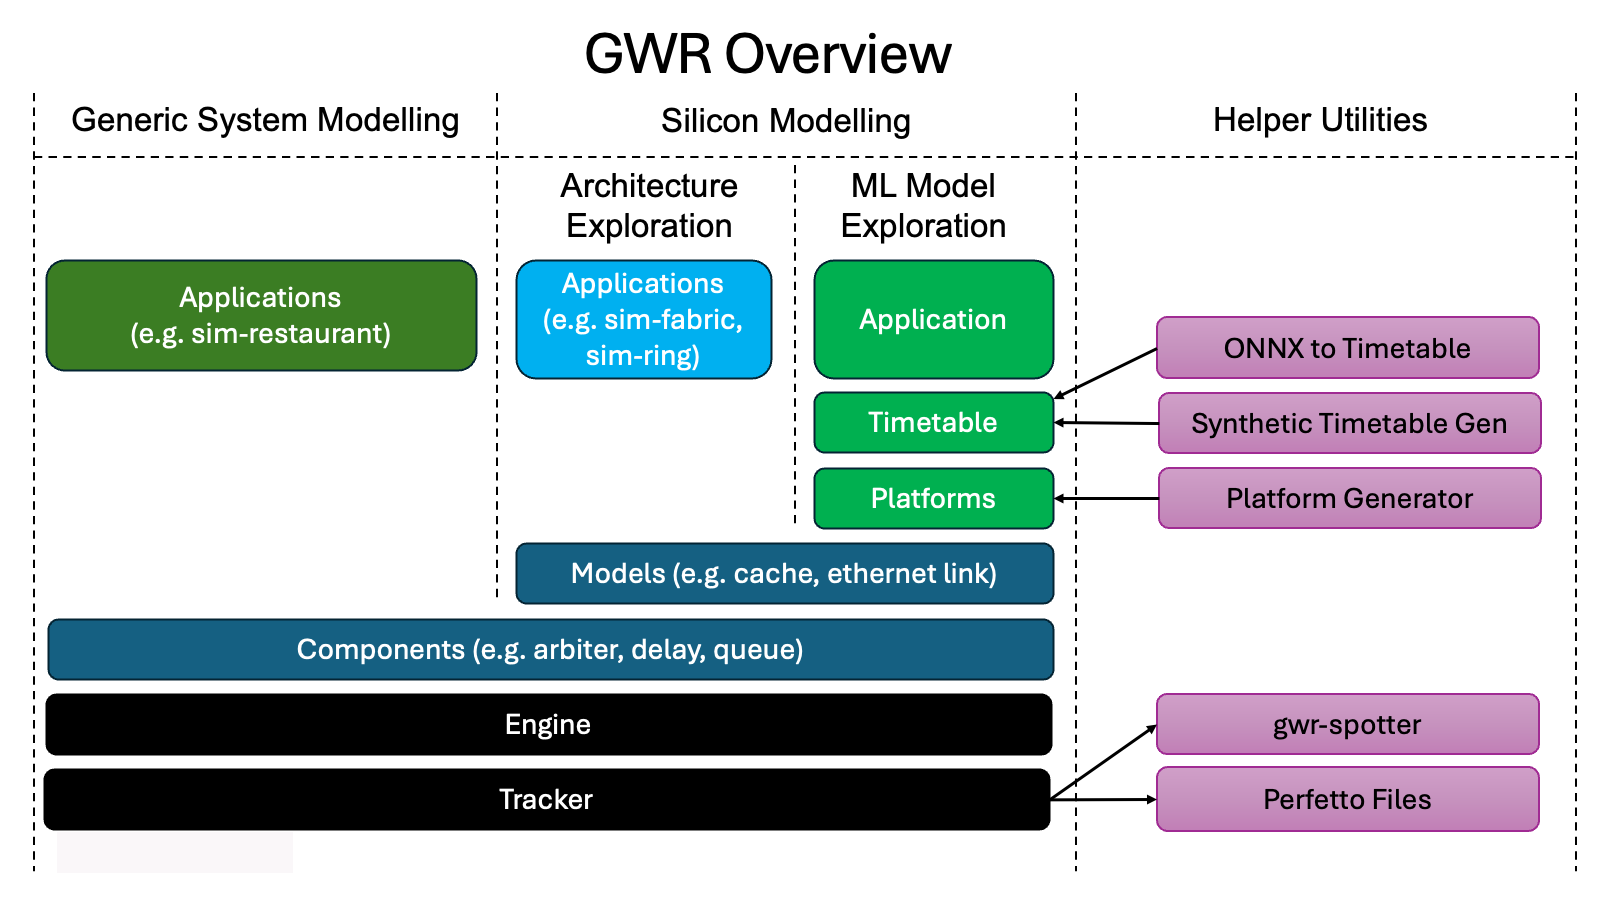
Welcome to the GWR project. The core GWR packages are developed as a monorepo, which together provide the following functionality:
- An event-driven simulation engine.
- Logging and log viewing system.
- Hierarchical configuration support.
- Documentation tooling.
- A library of components and basic models.
- A set of application examples.
This example shows how the GWR engine and components can be used to create a simple simulation. This simulation connects a source, which will transmit 10 objects, to a sink, which counts the number of objects it receives.
use gwr_components::sink::Sink;
use gwr_components::source::Source;
use gwr_components::{connect_port, option_box_repeat};
use gwr_engine::engine::Engine;
use gwr_engine::run_simulation;

fn main() {
  let mut engine = Engine::default();
  let clock = engine.default_clock();
  let mut source = Source::new_and_register(&engine, engine.top(), "source", option_box_repeat!(0x123 ; 10));
  let sink = Sink::new_and_register(&engine, &clock, engine.top(), "sink");
  connect_port!(source, tx => sink, rx)
      .expect("should be able to connect `Source` to `Sink`");
  run_simulation!(engine);
  assert_eq!(sink.num_sunk(), 10);
}GWR aims to provide a complete modelling workflow, supporting silicon chip and system architecture projects from the initial exploration phase, through more detailed evaluations, and finally to a full specification and golden reference quality model.
Async language features are utilised to allow expressive description of physical world parallelism. An asynchronous runtime executor is included within the gwr-engine package for this purpose, which supports both event-driven and clocked modelling.
GWR is designed with scalability in mind, with the aim being to enable both high accuracy/detailed simulations and large scale simulations in a tractable timeframe. To meet this goal it is therefore important that both the development of models using GWR, as well as the execution of these models is efficient. A developer guide covering the use of the GWR for modelling, as well as API documentation for each package is included. The general philosophy adopted is to raise errors as early as possible for developers, so as many as possible will be at compile time rather than run time, as well as to guard against common errors such as unconnected or misconnected model components where possible.
Built-in support for external documentation tooling allows for the creation of a single source of truth which contains both the readable specification and the executable model. Where appropriate sections of specification and the reference model for that part of the specification can reside within the same source file if desired.
Continuous integration is run on both Linux (Ubuntu LTS) and macOS to ensure ongoing compatibly with whichever platform developers wish to use. A robust release process is also defined to guarantee semantic versioning of packages and automated generation of release notes ensuring user upgrade processes are as smooth as possible.
GWR is written in Rust and takes advantage of a number of the features it offers. In brief summary these are the strong typing system and emphasis on correctness in Rust, excellent and easy to use tooling and build system, and excellent runtime performance (which we have found to be on a par with C++). More information on this, and guides to help get started with the language are included in the Rust chapter of the developer guide.
Some packages within the GWR workspace, such as the -sys packages, use git
submodules to make source code from other repositories avaliable. When cloning
this repo passing the --recurse-submodules option is sufficient to make
everything required avaliable. The --shallow-submodules can also be passed.
All of the required tooling to build and use, and to develop GWR can be installed using the scripts included within the repo. These scripts are designed to be used by both users and the CI system.
Dependencies will be installed using package managers where possible, with APT being used on Linux and Homebrew on macOS (Homebrew itself will be installed as required if not already avaliable). Various cross-platform package managers are also used, including rustup, Cargo, and npm.
See the Using GWR Packages and Developing GWR Packages sections for further details on these install scripts.
The correct Rust toolchain will automatically be selected and used by rustup
when commands are executed from within the GWR directory (or below). This
behaviour is controlled by the the rust-toolchain.toml file.
For users of the GWR packages a stable Rust toolchain is required, as well as
external tools such as Asciidoctor, Cap'n Proto, and mdBook. All of the
required build dependencies can be installed by running:
./.github/actions/install-build-dependencies/install.shImportant
To ensure that the correct Rust toolchain is used the script must be executed from within the GWR directory.
Tip
Although the script is interactive, selecting the default option (Enter) at every step is a reasonable choice and will result in a working environment.
Note
Some of the actions taken by the script may request elevated permissions via
sudo.
For developers of the GWR packages both stable and nightly Rust toolchains
are required, as well external tools such as cargo-deny, cargo-about
cargo-semver-checks, Cocogitto, prek, Prettier, and Release-plz. All
of the required development dependencies can be installed by running:
./.github/actions/install-dev-dependencies/install.shImportant
To ensure that the correct Rust toolchain is used the script must be executed from within the GWR directory.
Tip
Although the script is interactive, selecting the default option (Enter) at every step is a reasonable choice and will result in a working environment.
Note
Some of the actions taken by the script may request elevated permissions via
sudo.
Finally the Git hooks need to be installed within the cloned copy of the GWR repo:
prek installThe process for branching the repo is codified by the Branching item of the Feature/fix development checklist.
Changes to GWR packages are developed on branches separate to main (the
default) branch of the repo, and then incorporated when complete via a pull
request.
Push-specific CI runs only on main, experimental and branches whose names
begin with feature-, for example, feature-new-example-app.
Note
The experimental branch will never be merged into the main branch. However
updates from main may be merged into experimental via a pull request.
Before opening a pull request, a feature branch must be renamed to remove the
feature- prefix. Use of the pr- prefix, for example, pr-new-example-app is
the usual convention. Branches named without the push-specific prefixes are
preferred as they do not cause the push-specific CI workflow to run, avoiding a
duplicate run alongside the pull request-specific workflow.
Draft pull requests create only skipped CI job entries, so no runner work is performed. CI runs when a pull request is opened as ready for review, when a draft is marked ready, when a ready pull request is reopened, and after each subsequent push or rebase. Moving a pull request back to draft cancels any in-progress CI run.
---
title: GWR git branching scheme
config:
  theme: 'base'
  gitGraph:
    parallelCommits: false
---
gitGraph:
  checkout main
  commit id: "initial commit"

  branch experimental

  branch pr-publish-docs
  commit id: "infra: publish built documentation"

  checkout main
  merge pr-publish-docs

  checkout experimental
  branch feature-visualiser-experiment
  commit id: "feat: add visualiser package"
  commit id: "feat: component hierarchy viz"

  branch pr-visualiser-experiment
  commit id: "feat: component hierarchy visualisation"

  checkout experimental
  merge pr-visualiser-experiment

  checkout main
  branch feature-visualiser
  commit id: "feat: component visualisation"
  commit id: "feat: model visualisation"

  branch pr-visualiser
  commit id: "feat(gwr-visualiser): component visualisation"
  commit id: "feat(gwr-visualiser): model visualisation"

  checkout main
  merge pr-visualiser

  checkout experimental
  branch pr-updates-from-main
  commit id: "chore: remove experimental visualiser"
  merge main

  checkout experimental
  merge pr-updates-from-main
This diagram is read left to right and top to bottom (like the Network graph view of GitHub). Pull requests are shown as if they land using merge commits, single points (the circles with white centres) on the graph, though in reality they will be rebased without squashing their individual commits.
The process for creating commits is codified by the Commits item of the Feature/fix development checklist.
During the commit process a number of different hooks will be invoked by prek:
- The Cocogitto tool is used to lint the text of the commit message, ensuring that it adheres to the Conventional Commits specification.
- All packages within the workspace will be checked for adherence to proper
semantic versioning using cargo-semver-checks.
- As this can be a time consuming set of checks to run, by default, they are only performed by the CI system.
- The checks can be run locally with:
prek run --all-files cargo-semver-checks
- All dependencies will be checked for vulnerabilities and compatible licensing using cargo-deny.
- The licenses of all dependencies will collated and included in the licenses.html file using cargo-about.
- Source files will be formatted using
rustfmt, Prettier, and builtin hooks included with prek. - Links in Markdown source will be validated using lychee.
- Rust source will be linted using clippy (via the
cargo clippy-strictalias). - JavaScript source will be linted using ESLint.
- Rust source will be compiled using
cargo check.
The release process for all packages within the GWR workspace is handled by the Release-plz tool.
To start the release process, run:
release-plz release-prwhich will bump the version numbers of any updated packages and update the package CHANGELOG.md files as required. These changes will be automatically committed and a pull-request opened on Github for the proposed release to be reviewed.
Once the pull-request has been approved and merged the release process is completed by running:
release-plz releasewhich will tag the repo marking the correct commit with the versions for each
updated package, and automatically publishes the updated packages using
cargo publish and as Github releases.
The developer guide is an mdbook. In order to produce the document it is
necessary to first install the development dependencies by running:
./.github/actions/install-dev-dependencies/install.shand then build and open the user guide with:
cd gwr-developer-guide/
mdbook build --open
If developing the guide then this command will launch a process that continually monitors the source and regenerates the HTML if it changes (causing the browser to automatically refresh):
mdbook serve --openDocumentation within the GWR source is done using rustdoc formatting such
that APIs are documented and any code snippets are compiled and run.
This documentation can be generated by running:
cargo doc-gwr --openThe documentation can also be generated to include private items, which can be useful when developing GWR packages, by running:
cargo doc-gwr-dev --open