
A pipeline for processing and calling high-frequency and low-frequency variants from Illumina sequence data for Influenza viruses
The pipeline accomplishes the following:
- Organize raw read data
- Remove adaptor contamination and trims low quality reads and bases
- Assemble cleaned reads into consensus contigs using IRMA
- Calls high-frequency variants using GATK4
- Calls low-frequency variants using LoFreq
- Summarizes variant calling data
- Link variants to curated amino acids of interest
- Screen consensus genomes, and optionally low-frequency variants, for H5N1 markers using FluMut
- Optional dN/dS with SNPGenie and per-site selection coefficients with WFABC
Flumina uses Nextflow for program execution and cluster job submission management. With multi-job cluster management, analyzing many samples in bulk can be accomplished quite rapidly. The speed will increase as more threads are available, as individual pieces of the pipeline can be run in tandem.
A companion pipeline for Oxford Nanopore data, FluPore, is run the same way.
There are three ways to run Flumina. The container includes everything, so unless you have a reason to manage the dependencies yourself, use one of the container options.
| Use when | |
|---|---|
| 1. Conda | You want the tools installed directly, or cannot use containers |
| 2. Container, single job | Simplest. Everything runs in one allocation |
| 3. Container, multi-job | Fastest for many samples. Each step becomes its own cluster job |
All three take the same arguments.
Clone the repository and create the environment from the included environment.yaml:
git clone https://github.com/flu-crew/Flumina.git
cd Flumina
conda env create -f environment.yaml -n Flumina
conda activate Flumina
Flumina also needs Nextflow, which is not in the conda environment. Install it from https://www.nextflow.io, or load your cluster's module. Then add Flumina to your PATH and run it:
export PATH=$PATH:"$(pwd)/Scripts"
flumina -i raw_reads -o resultsDownload the image and run it. Nothing else needs installing, and nothing needs to be cloned:
apptainer pull -F docker://chutter/flumina
apptainer run flumina_latest.sif -i raw_reads -o results
Or with a configuration file, which is picked up automatically if it is named config.cfg and sits in your working directory:
apptainer run flumina_latest.sif -c config.cfgDocker works the same way, but only sees folders you share with it:
docker run -u $(id -u):$(id -g) -v "$(pwd)":/data -w /data chutter/flumina -i raw_reads -o resultsEvery step runs inside your one allocation, so give the job real resources and match -t and -M to them.
Apptainer mounts your home and working directory automatically. If your reads are somewhere else, bind that location:
export APPTAINER_BIND=/projectEach step is submitted as its own cluster job, so independent samples and steps run at the same time. Each of those jobs still runs inside the container.
Nextflow runs on the host here, so it needs the pipeline files. Copy them out of the image once — nothing is downloaded:
module load nextflow apptainer
apptainer pull -F docker://chutter/flumina
apptainer run flumina_latest.sif --export ./flumina
Then run it, from a small job with a long wall time:
./flumina/Scripts/flumina -c config.cfg -p slurm,apptainerSet -Q and -A to your queue and account. Besides slurm, the profiles pbs, pbspro, sge and lsf are available. Example job scripts for both container methods are included: job_script_example_config.sh and job_script_example_arguments.sh.
Two things to note. -t and -M now apply per step, not to the whole run, so 8 threads is usually plenty. And Nextflow works out the container binds itself, so APPTAINER_BIND is not needed.
All of Flumina's arguments are laid out in the help menu, accessed with flumina -h. Only -i and -o are needed for a basic run; everything else has a default.
    Arguments:
        -i : Input directory of raw paired fastq.gz reads. Default is
             'raw_reads'
        -o : Output directory. Default is 'Flumina_results'
        -t : Number of threads. Default is 4
        -M : Maximum memory any single step may use, e.g. '32.GB'. Default is
             6.GB, which fits a laptop or a stock Docker Desktop VM. Raise it
             on a workstation or cluster. The slurm profile raises it for you
        -c : Configuration file holding any of these parameters in KEY=VALUE
             form (see config.cfg). Command-line arguments override it.
             Default is 'config.cfg' when one exists in the working directory
        -n : CSV with the file name that matches both read pairs in the "File"
             column and the sample name in the "Sample" column. Default is
             'file_rename.csv'
        -r : Reference FASTA with each gene segment as a separate entry.
             Default is the bundled 'reference.fa'
        -a : Curated amino acid database CSV with the columns "Gene",
             "Amino_Acid", and "Type". Default is the bundled
             'curated_database.csv'
        -m : Metadata CSV with at least a "Sample" column. Default is
             'metadata.csv'
        -g : Metadata column name used to group the summaries, e.g. cow versus
             bird versus poultry. Use 'NULL' for no grouping. Default is
             'discrete_host'
        -d : Minimum read depth to keep a variant. Default is 100.
             WARNING: below 100 LoFreq and GATK report false fixations from low
             template input (the founder/jackpot effect), so raise this rather
             than lower it unless you know why you are doing so.
        -q : Minimum quality to keep a variant, 0 disables. Default is 30
        -f : Minimum allele frequency to keep a variant (0-1).
             Default is 0.01 (1%)
        -l : Also screen LOW-FREQUENCY variants for H5N1 markers with FluMut,
             at this minimum allele frequency (0-1). Off by default
        -G : Run SNPGenie dN/dS analysis. Off by default
        -W : Run WFABC selection analysis. Off by default. Needs metadata with
             an individual column and a time-point column
        -x : IRMA configuration file, e.g. to set TMP or SINGLE_LOCAL_PROC.
             Default is 'irma_config.sh' when one exists in the working
             directory
        -p : Execution profile. Container: 'standard', 'docker', 'apptainer'.
             Scheduler: 'slurm', 'pbs', 'pbspro', 'sge', 'lsf'. Combine with a
             comma, e.g. '-p slurm,apptainer'
        -Q : Scheduler queue/partition
        -A : Scheduler account options, passed through as given
        -j : Maximum scheduler jobs in flight at once. Default is 100
        -w : Nextflow work directory. Default is './work'. On a cluster point
             this at scratch
        -s : Skip a portion of Flumina. Options: '0' = skip nothing,
             'i' = skip IRMA assembly, 'm' = skip FluMut marker screening.
             These options may be combined. Default is 0
        -R : Resume a previous run, reusing all successfully completed work
        -N : Dry run. Print the Nextflow command that would be run, then exit

        --export [dir] : copy the pipeline out of the container so Nextflow can
             run on the host, needed for '-p slurm'. Defaults to './flumina'

        --version : prints the version number
If a run fails partway through, fix the cause and re-run with -R to resume rather than starting over. This only works if the work directory is still there, so do not delete it until you are happy with the results.
The work directory holds every intermediate file and ends up roughly the size of the results again, so a run costs about twice what you keep. Three things help:
-C deletes the work directory once a run completes successfully. Use it for production runs; leave it off while you are still getting a run to work, because it discards the resume cache too.
PUBLISH_MODE="link" in the config publishes results as hard links instead of copies, so results and work share the same data and a run takes about half the space. It only works when the output and work directories are on the same filesystem. Do not use symlink — deleting the work directory would leave broken links.
Old runs can be cleared at any time with Nextflow's own command, which understands what is still needed:
nextflow clean -f -before <run-name>
nextflow log lists the run names. Add -n to any of these to see what would be removed without removing it.
Often the case with multiplexed samples in sequence capture projects, you will find that the names of the reads often are not the desired final names for the sample. To create the renaming file, a .csv file is needed with only two columns: "File" and "Sample". An example is included in the main repo ("example_file_rename.csv").
The "File" column: the unique string that is part of the file name for the two read pairs, while excluding read and lane information. Example:
AX1212_L001_R1.fastq.gz
AX1212_L001_R2.fastq.gz
Are the two sets of reads for a given sample. Your "File" column value would then be:
AX1212
The "Sample" column: What you would like your sample name to be. This will be used up in all downstream analyses unless changed. Ensure that your samples all have unique names and are not contained within each other (e.g. Name_0 is contained within Name_01). Also exclude special characters and replace spaces with underscores. Hyphens are also ok. In this example, the "Sample" Column would be:
Influenza_virus_AX1212
Reads are found recursively, so nested per-sample directories are fine, and both compressed and uncompressed fastq are accepted. A sample listed in the CSV with no reads does not stop the run: it is reported and recorded in logs/missing_samples.log, and the rest carry on.
A reference sequence is needed to map the reads and compare amino acid changes to. This reference should have each gene as a separate entry in the fasta file, with the header including only the gene name. For now, multiple CDS reading frames should be included as separate fasta entries. There is no standard reference as the reference would depend on the research question. One is bundled with Flumina and used unless you supply your own with -r.
Flumina uses a configuration file to keep track of the parameters and easily add new ones. An example is included in the main repo, "config.cfg". Every setting has a command-line equivalent, and the command line wins, so a saved configuration can be reused with one-off changes:
flumina -c config.cfg -t 24 -o differentOutputFolderNothing in the file is required. A file named config.cfg in your working directory is picked up automatically.
A CSV of metadata to join with the amino acid data and summary data can be provided. This CSV file must have at least a column titled "Sample" [capital S] to make the join possible. Without it the summaries are simply not grouped. It is required only for WFABC, which needs an individual column and a time-point column to build allele-frequency time series.
Normally Flumina will output databases of all the amino acid changes and then a reduced set to those that are nonsynonymous. To create a database of known amino acids of interest, these can be matched to the full amino acid database and separated into a more manageable table. The three columns this CSV must include are
"Gene" - The Gene that matches the names of the gene used in the reference
"Amino_Acid" - The amino acid position in the reference
"Type" - A summary of the function of the amino acid change
Without one, the curated-site summary is skipped and everything else is unaffected.
irma_config.sh, is a configuration file with an example provided here for the program IRMA. Any of the standard IRMA parameters can be changed here and included in your working directory. The 3 essential parameters are provided as an example:
TMP=./irma_tmp
SINGLE_LOCAL_PROC=2
DOUBLE_LOCAL_PROC=1
TMP is the temporary directory that IRMA writes files, and it will use a sometimes unwritable or slow location, so setting this somewhere you can write to and has enough space helps.
Note that SINGLE_LOCAL_PROC should match the number of threads in your job or if using multi-job cluster submission it should match "--cpus-per-task"
Results are written to the output directory given by -o:
| Folder | Contents |
|---|---|
variant_analysis/ |
Variant tables, amino acid changes, and summaries |
variant_analysis/flumut/ |
H5N1 markers found in the consensus genomes |
variant_analysis/flumut_lowfreq/ |
H5N1 markers found in low-frequency variants (-l) |
IRMA-consensus-contigs/ |
Per-sample consensus genomes |
IRMA_results/ |
Full IRMA output per sample |
vcf_files/ |
Per-sample GATK and LoFreq VCFs |
BAM_files/ |
Aligned, sorted, duplicate-marked BAMs |
processed-reads/ |
Trimmed reads |
snpGenie_results/ |
Per-site dN/dS estimates (-G) |
wfabc_analysis/ |
Selection coefficients and Ne estimates (-W) |
logs/ |
Per-sample tool logs, and missing_samples.log if any sample had no reads |
pipeline_info/ |
Run timeline, resource report, trace, and the exact config used |
variant-table.csv and all_sample_amino_acids.txt carry a per-call verdict that
the pipeline computes, so every reader sees the same value. FluLens reads it from
the table:
| Column | Contents |
|---|---|
alt_reads |
Reads supporting the alt allele (DP4 alt forward + reverse), not depth × frequency |
strand_class |
balanced, some-skew, skewed, too-few-alt, no-ref-control (a fixed call), not-assessed (ONT), or empty |
assessment |
Looks real, Treat with caution, Likely artefact, or Cannot assess |
The verdict weighs strand balance, depth, allele frequency, and the alt-read count
against the run's MIN_DEPTH, MIN_ALLELE_FREQUENCY, and MIN_ALT. It uses the
reconciled frequency, so a GATK4 genotype is judged on its borrowed fraction, not on
its 1.0.
FluLens is an interactive viewer for Flumina and FluPore output. It shows all variant calls in a samples-by-codons grid. You can filter, sort, and click any cell to see the allele frequency, strand balance, and a quality verdict. FluLens runs in a browser and reads files on your machine. It uploads nothing.
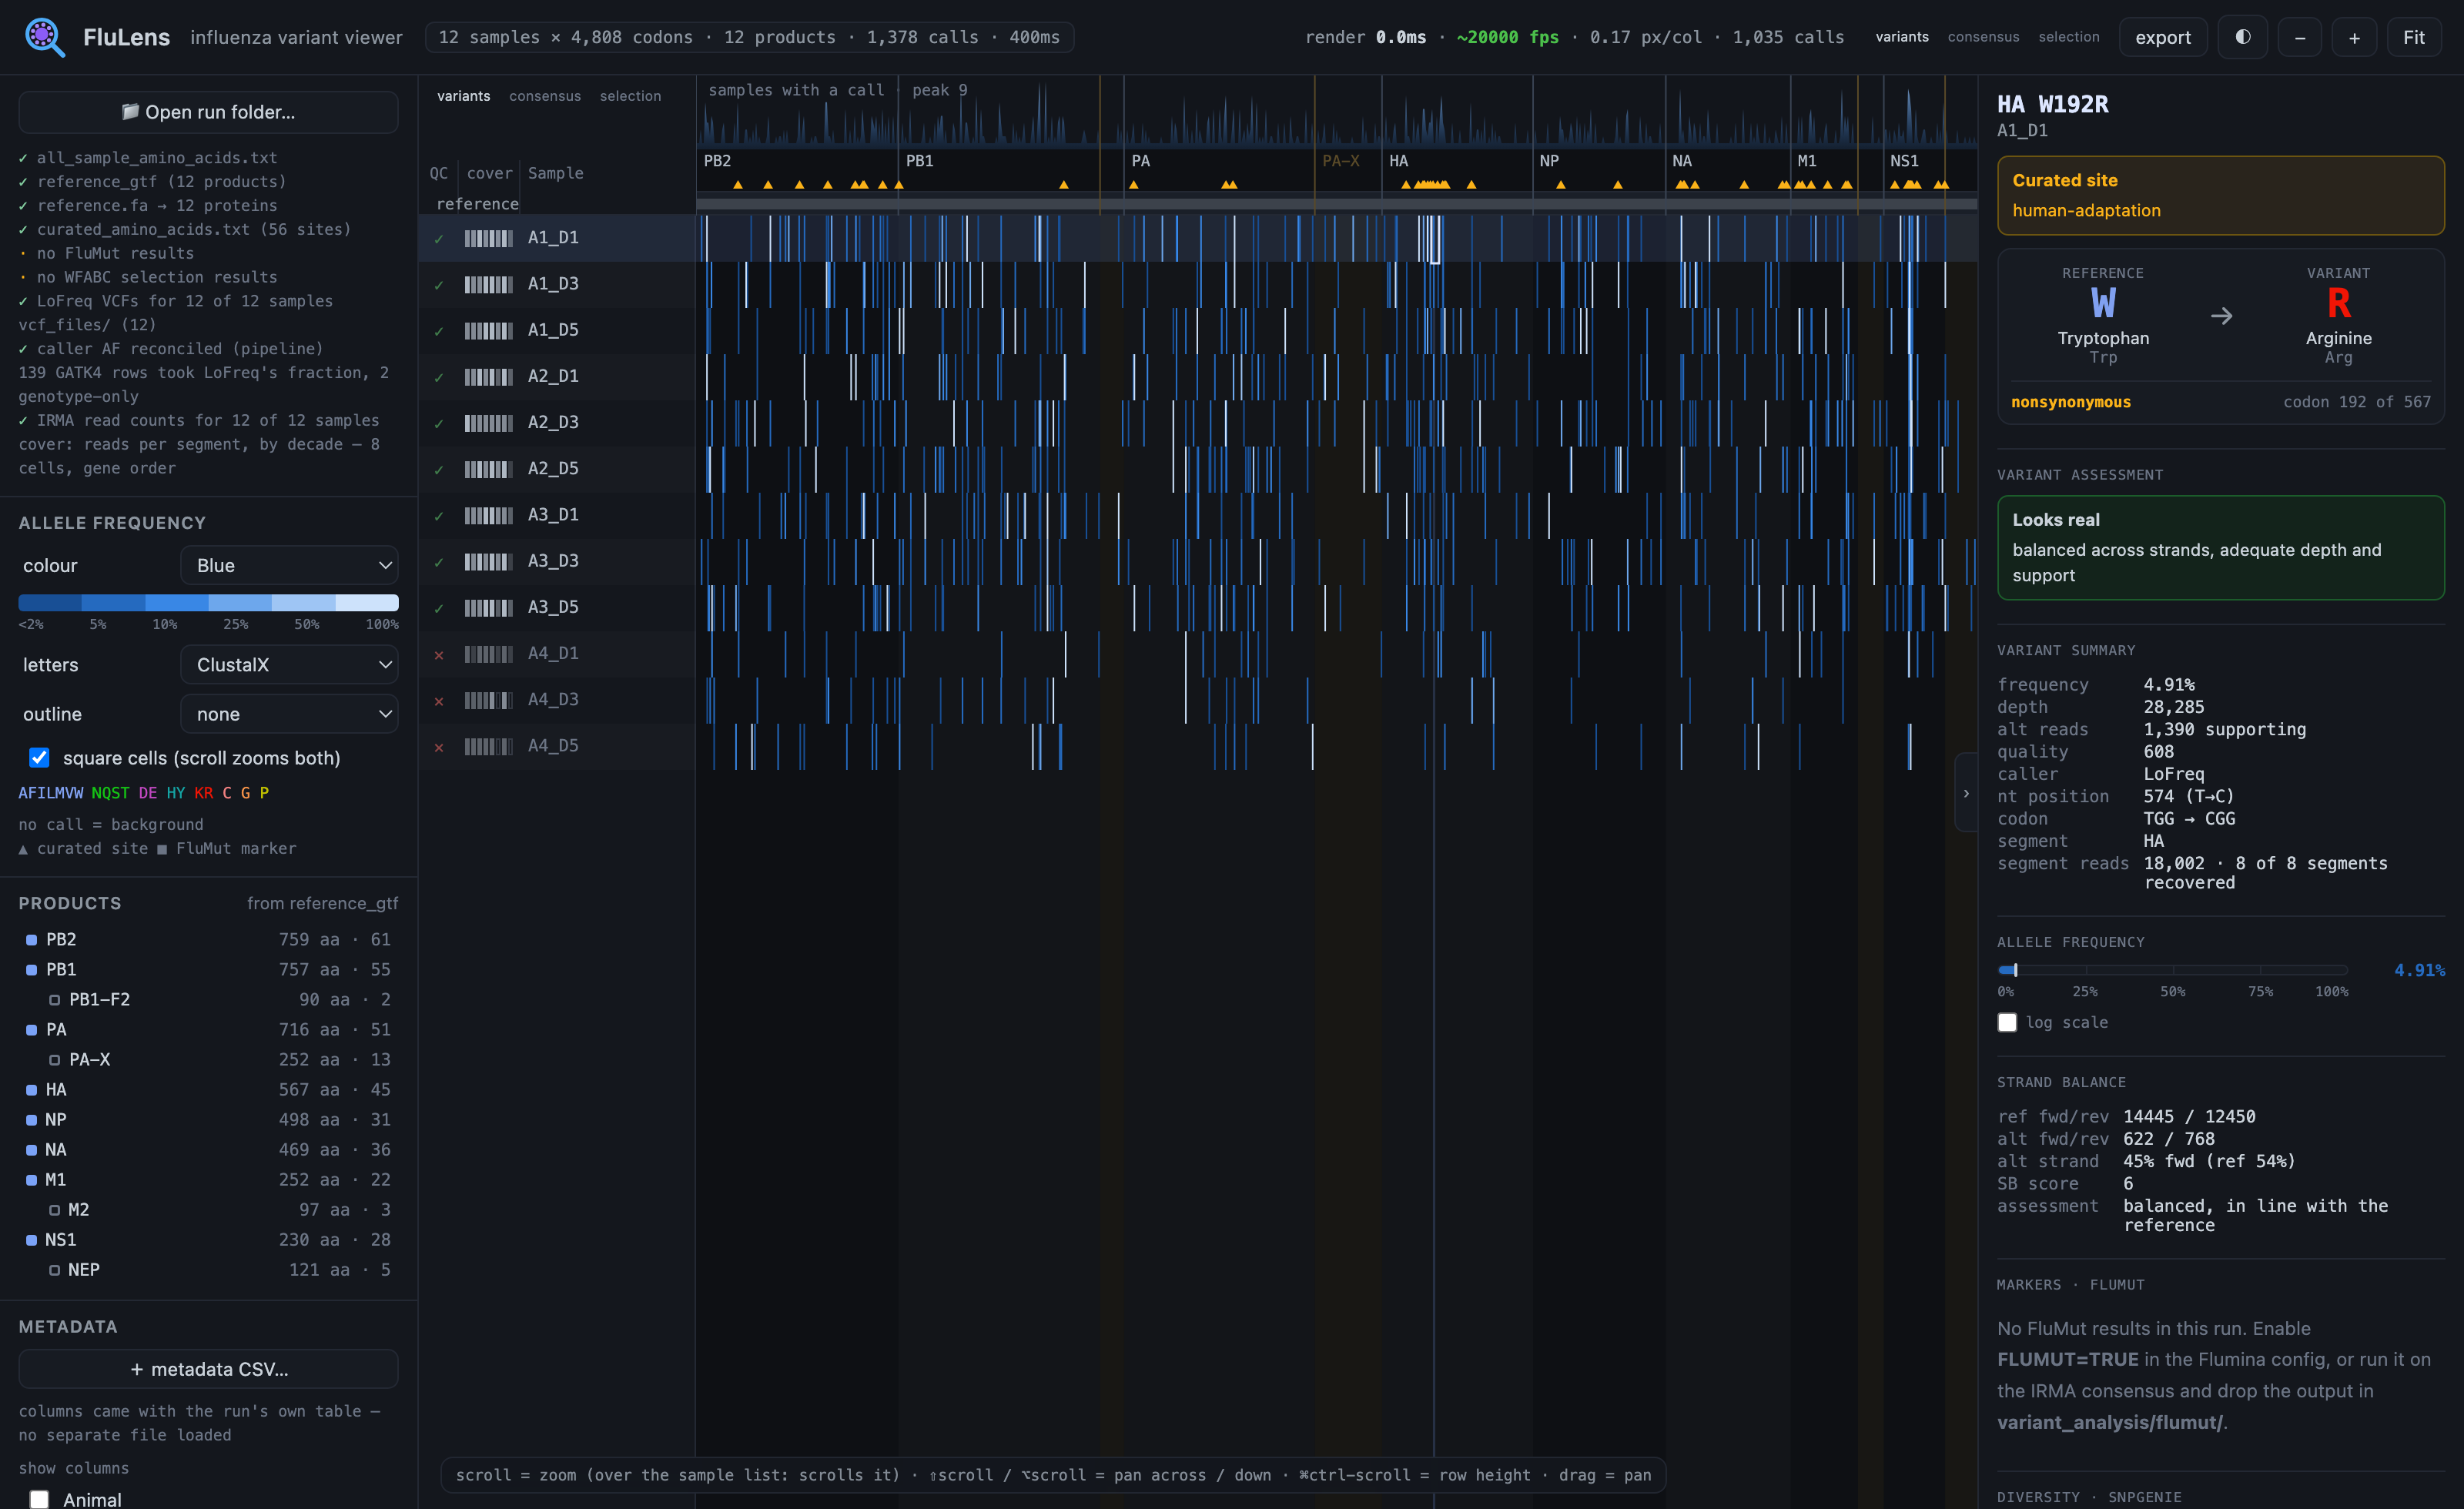
FluLens reads every output that Flumina can produce. To get the most from it, keep the default analyses turned on and add the optional ones that apply to your data:
| Setting | Default | What it gives FluLens |
|---|---|---|
| LoFreq / GATK4 variant calling | always on | the variant grid itself |
curated amino acid database (-a) |
on | curated-site markers in the grid |
| FluMut consensus screening | on | H5N1 marker annotations |
FluMut low-frequency screening (-l) |
off | markers present below consensus — turn it on |
metadata CSV (-m) |
off | sample grouping, QC context — provide one if you have it |
SNPGenie (-G) |
off | per-codon dN/dS diversity layer — turn it on if you want selection pressure |
WFABC (-W) |
off | per-site selection coefficients — time-series data only |
WFABC needs metadata with an individual column and a time-point column.
If your samples are not a time series, set WFABC to FALSE (the default). It
will not produce useful output without repeated sampling of the same individuals.
FluLens still works when analyses are off. It displays what it finds. If you skip FluMut, the marker panel stays empty. If you skip SNPGenie, the diversity layer is absent. The variant grid, assessment verdicts, pile-up, and coverage strip all work with just the core output.
▶ Open the Flumina example in FluLens — synthetic data, twelve samples, nothing to install.
To load your own run, open FluLens and
click Open run folder…. Select your Flumina output directory (the one that
contains variant_analysis/).