
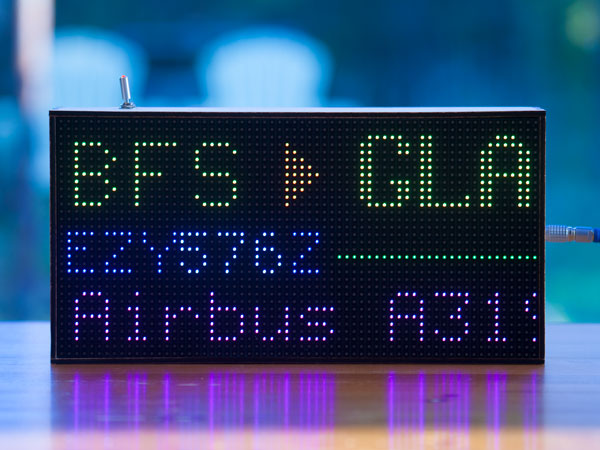
A Raspberry Pi-powered RGB LED matrix that shows you what aircraft are overhead. It sits on your fridge, or a shelf, or wherever you decide to put it, and quietly answers the important question: "What's that plane?"
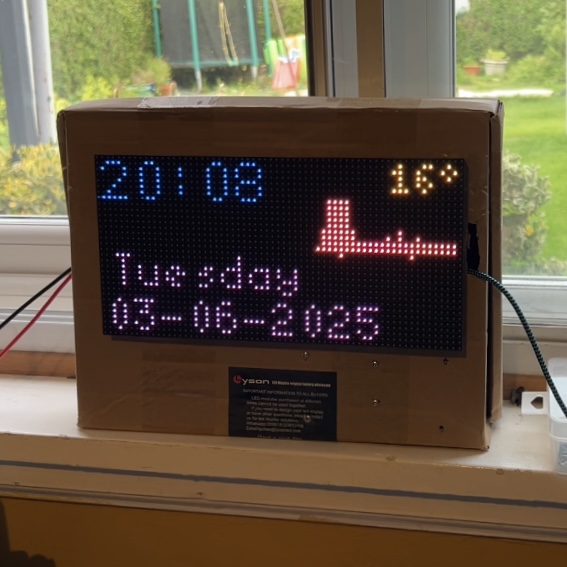
FlightTracker takes live aircraft data, works out what is nearby, and displays it on a 64x32 RGB LED matrix. When there's nothing overhead, it shows the time, weather, temperature, rainfall, or satellite passes.
For much more detailed documentation, visit colinwaddell.github.io/FlightTracker.
I've been working on this project for 5 years now, nearly every day, helping users and adding new features. If you'd like to show your support visit ko-fi.com/flighttracker
Recently (June 2026) this codebase has had a major rewrite. There are detailed guides on the update procedure but it's worth pointing out the change in branching:
mainis the new home for FlightTrackerv2masteris the resting place of FlightTrackerv1
Choose the script for your hardware and run it over SSH on a fresh Raspberry Pi OS (Lite) install:
# Raspberry Pi 3 / 4 / Zero
curl -sSL https://raw.githubusercontent.com/ColinWaddell/FlightTracker/refs/heads/main/platforms/pi/install.sh | bash

# Raspberry Pi 5
curl -sSL https://raw.githubusercontent.com/ColinWaddell/FlightTracker/refs/heads/main/platforms/pi5/install.sh | bash
Each installer detects your hardware, clones the repo, sets up the Python environment, and configures a systemd service so FlightTracker starts on boot. Each script will redirect you to the correct one if it detects it's running on the wrong platform.
If you'd rather do it manually - or you want to understand what the script does - follow the guide for your platform:
| Platform | Guide |
|---|---|
| Raspberry Pi 3 / 4 / Zero | platforms/pi/INSTALL.md |
| Raspberry Pi 5 | platforms/pi5/INSTALL.md |
| Desktop simulator | platforms/simulator/INSTALL.md |
An LED wired to a GPIO pin can blink while flight data is loading. Enable it in the web UI under Hardware settings, and set the GPIO pin number to match your wiring.
If you have a WeatherAPI key configured, you can display a 24-hour rainfall chart alongside the temperature. Set the weather mode to "temperature + rainfall" in the web UI.
By default the tracker pulls flight data from FlightRadar24. If you run your own ADS-B receiver with tar1090 or a compatible PiAware / dump1090-fa setup, you can use that as your data source instead - no FlightRadar24 account or API access required.
- A device running dump1090-fa, readsb, or similar, with tar1090 installed
- The device must be reachable on your local network from the Flight Tracker Pi
- tar1090-db enrichment active (the default in most installations) - it provides the aircraft type descriptions used by this software
Try each of the following in your browser, replacing your-receiver with your device's hostname or IP address, until you get a response containing a list of aircraft:
http://your-receiver/tar1090/data/aircraft.json
http://your-receiver:8080/data/aircraft.json
http://your-receiver/dump1090-fa/data/aircraft.json
http://your-receiver/skyaware/data/aircraft.json
The response should be a JSON object with an "aircraft" array.
Once you have the URL, enter it in the web UI under the ADS-B / tar1090 settings. The tracker will automatically use your local receiver when a URL is configured, and fall back to FlightRadar24 if it is not.
- Aircraft type (e.g. "Airbus A-320") is sourced directly from the tar1090 aircraft database
- Origin and destination airport codes are looked up via adsbdb.com
- All position and altitude data comes from your receiver in real time
- No rate limiting or API key required
OpenSky Network is a free, community-driven ADS-B network that can replace FlightRadar24 as the flight data source. No subscription is required - a free registered account gives you enough API credits for 30-second polling.
- A free account at opensky-network.org
- An API client created under Account → API Clients (gives you a Client ID and Client Secret)
- Log in to the FlightTracker web interface
- Under Data Source, select OpenSky Network
- Enter your Client ID and Client Secret
- Save - the tracker will restart and begin fetching from OpenSky
- Uses OAuth2 credentials (Client ID + Client Secret) rather than a third-party library
- Aircraft type and route origin/destination are both looked up via adsbdb.com, the same service used in tar1090 mode
- If your credentials are invalid the display will show
KEY ERRORas the callsign rather than going blank - Data refreshes every 30 seconds
To see when a particular satellite is over head enter its NORAD ID in the device config and it'll let you know where to look, its altitude and speed.
The main entrypoint is the script at the repo root:
cd /home/pi/FlightTracker
source env/bin/activate
python3 flight-tracker.py help
The CLI supports a small set of commands for configuration and maintenance:
Usage: python flight-tracker.py [command]
Commands:
  config                 Dump current configuration as JSON
  data                   Print the platform data directory path
  reset password         Clear web_password_hash in the config
  reset settings         Delete the config.json file
  cache clear            Wipe all on-disk cache files (routes and TLE)
  interface enable       Enable the web interface in the config
  interface disable      Disable the web interface in the config
  test overhead_fr24     Test FlightRadar24 data source
  test overhead_tar1090  Test tar1090 data source
  test overhead_osn      Test OpenSky Network data source
  test tle               Test TLE satellite lookup
  help                   Show this help message
  --version              Print the program version
Test commands accept --parameters and --interval/--limit for repeated runs. Run python flight-tracker.py test <target> --help for details.
For normal operation, start the tracker with python3 flight-tracker.py and use the configuration file or the web settings UI to control its behaviour.
If your checkout is still on the old master branch, switch to main before pulling updates:
cd /home/pi/FlightTracker
git fetch --all
git checkout main
git pull
source env/bin/activate
pip install -r platforms/pi/requirements.txt
sudo systemctl restart FlightTracker.service-
The installation went well, you selected Convenience Mode (no soldering) and can't see anything: Head into the settings interface and go into the
Hardwaresection and select Convenience Mode for a second time, then hit save. -
Only the top half of the screen is lit up: Check the panel you've bought to see if it says
32S(1:32 scan rate) anywhere on it. These aren't supported by this code yet but it should be an easy fix - more details here. If you get it working let me know in the ticket as I want to add this to the settings page. -
Everything looks red: Your power supply isn't supplying enough power to the screen.
-
I changed a setting now the deice wont start: Reset your settings by deleting your config and rebooting
# Before v2.3.0
rm ~/.local/share/FlightTracker/config.json
sudo reboot

# After v2.3.0
cd ~/FlightTracker
source env/bin/active
python flight-tracker.py reset settings- Everything is broken and it wont boot: Raise a ticket and tell me what you can see. The most useful info comes from trying to run it manually like this:
# Disable the service
sudo systemctl stop FlightTracker.service

# Get ready to run the code
cd ~/FlightTracker
source env/bin/activate

# Copy the output of this into a ticket
python flight-tracker.py

# Include this in the ticket
# Please remove any confidential information before posting (specifically: API keys)
python flight-tracker.py config

# If you want to resart the service
sudo systemctl start FlightTracker.serviceThis table is for reference if you've disabled the web interface (web_interface_enabled: false). All settings are otherwise accessible through the web UI.
| Key | Description | Default |
|---|---|---|
flight_location_mode |
"simple" (centre + radius) or "advanced" (drawn box + observer) |
"simple" |
flight_lat / flight_lng |
Centre of the flight search zone (simple mode) | 55.87 / -4.25 |
flight_radius |
Search radius in km (simple mode) | 20.0 |
flight_zone_tl_y / flight_zone_tl_x |
Search box top-left corner, lat/lng (advanced mode) | 56.05 / -4.57 |
flight_zone_br_y / flight_zone_br_x |
Search box bottom-right corner, lat/lng (advanced mode) | 55.69 / -3.93 |
flight_observer_lat / flight_observer_lng |
Observer position for weather, sunrise/sunset, satellite passes, and flight distance sorting (advanced mode) | 55.87 / -4.25 |
flight_min_altitude |
Ignore aircraft below this altitude (metres) | 100.0 |
flight_max_altitude |
Ignore aircraft above this altitude (metres) | 10000.0 |
airport_display_style |
0 = short code, 1 = airport name, 2 = abbreviated name, 3 = municipality, 4 = municipality + country |
0 |
home_airport_code |
IATA code of your local airport - highlighted on the display | "" |
journey_blank_filler |
Filler shown for blank journey segments | "???" |
details |
Bottom row: 0 = aircraft make/model, 1 = altitude/speed/heading |
0 |
weatherapi_key |
API key for weatherapi.com. Leave blank to disable weather | "" |
weather_mode |
0 = off, 1 = temperature only, 2 = temperature + 24-hour rainfall graph |
0 |
rain_sensitivity |
0 = dry, 1 = moderate, 2 = wet |
1 |
temperature_unit |
"c" for Celsius, "f" for Fahrenheit |
"c" |
speed_unit |
"kmh" for km/h, "mph" for miles/h, "kts" for knots |
"kmh" |
height_unit |
"m" for metres, "ft" for feet |
"m" |
theme |
0 = default, 1 = monochrome, 2 = pastel |
0 |
screen_brightness |
Display brightness from 1 (dim) to 5 (full) |
3 |
screen_rotate |
Rotate the display by 180° | false |
display_speed |
Animation speed preset: default, slower, or faster |
"default" |
screen_schedule_enabled |
Enable scheduled brightness changes | false |
screen_schedule_auto |
Use the brightness schedule automatically | false |
screen_schedule_start |
Schedule start time (HH:MM) |
"22:00" |
screen_schedule_end |
Schedule end time (HH:MM) |
"07:00" |
screen_schedule_brightness |
Brightness level used during the scheduled window | 0 |
clock_24hr |
true for 24-hour clock |
true |
date_format |
0 = YYYY-MM-DD, 1 = DD-MM-YYYY, 2 = MM-DD-YYYY |
0 |
web_interface_enabled |
Enable the config UI and QR code on boot | true |
web_port |
TCP port for the Flask config server (1024-65535) | 8584 |
web_password_hash |
SHA-256 hash for the web UI password | "" |
gpio_slowdown |
1-4; increase if the display flickers |
1 |
hat_pwm_enabled |
Enable PWM via Pi audio hardware (requires a solder bridge) | true |
loading_indicator |
Loading indicator mode: "none", "pixel" (on-screen blink), or "gpio" (external LED) |
"pixel" |
loading_led_gpio_pin |
GPIO pin number for the loading LED (only used when loading_indicator is "gpio") |
"" |
data_source |
"fr24" for FlightRadar24, "tar1090" for a local receiver |
"fr24" |
tar1090_url |
URL of a local ADS-B receiver's aircraft.json |
"" |
max_flight_lookup |
Number of nearby flights to track at once | 5 |
callsign_format |
"icao" for ICAO callsign (e.g. BAW123), "iata" for IATA flight number (e.g. BA123) |
"icao" |
satellite_tracking_enabled |
Enable satellite pass tracking | true |
satellite_norad_ids |
NORAD IDs for tracked satellites | [25544] |
satellite_min_elevation |
Minimum elevation for satellite passes | 20 |
satellite_max_count |
Maximum number of satellites to plot at once | 5 |
satellite_timeout_enabled |
Limit how long the satellite scene is shown per pass | false |
satellite_timeout_seconds |
Seconds from a pass's start (AOS) before the scene yields to flight tracking | 30 |
log_level |
Logging verbosity: DEBUG, INFO, WARNING, ERROR, or CRITICAL |
"INFO" |
If you'd like to contribute to FlightTracker - whether it's a bug report, feature idea, or pull request - please read the contributing guide.
FlightTracker builds on the work of several open-source projects and contributors:
- Display drivers — thanks to Henner Zeller for the rpi-rgb-led-matrix C++ library and Python bindings (used on Pi 3/4/Zero), and to Adafruit for the adafruit_blinka_raspberry_pi5_piomatter driver (used on Pi 5).
- plane-tracker-rgb-pi — thanks to c0wsaysmoo for letting me copy some of their great work.
- FlightRadarAPI — thanks to JeanExtreme002 for the FlightRadar24 API library.
Flight Tracker is released under the GNU General Public License v3.0. You're welcome to use, modify, and share the code - just keep it under the same license and include proper attribution (retain the copyright and license notice). See LICENSE.md for details.