The CI process involves activities that require infra resources such as CPU, memory (RAM), and many more. The amount of resources required depends on the complexity of the application. In other words, large applications require more resources compared to small applications.
Therefore, applying a common infra configuration to all applications is not optimal. Since resources incur heavy costs, it's wise to efficiently allocate resources (not more, not less).
With the 'Build Infra' feature, Devtron makes it possible for you to tweak the resources as per the needs of your applications. The build (ci-runner) pod will be scheduled on an available node (considering applied taints and tolerations) in the cluster on which 'Devtron' is installed.
{% hint style="warning" %}
Users need to have super-admin permission to configure Build Infra. {% endhint %}
From the left sidebar, go to Global Configurations → Build Infra.

You will see the Default Profile and a list of Custom Profiles (if they exist). Setting up profiles makes it easier for you to manage the build infra configurations, ensuring its reusability in the long term.
This contains the default infra configuration applicable to all the applications, be it large or small.

You may click it to modify the following:
- CPU - Processor core allocated to the build process. See CPU units.
- Memory - RAM allocated to the build process. See memory units.
- Build Timeout - Max. time limit allocated to the build process. See timeout units.

Furthermore, CPU and Memory have 2 fields each:
-
Request - Use this field to specify the minimum guaranteed amount of CPU/Memory resources your application needs for its CI build. In our example, we required 1500m or 1.5 cores CPU along with 6 GB of RAM.
-
Limit - Use this field to set the maximum amount of CPU/Memory resources the build process can use, even if there is a lot available in the cluster.

Instead of default profile, you can create custom profiles having different infra configurations. Example: One profile for Python apps, a second profile for large apps, and a third profile for small apps, and many more.
-
Click Create Profile.
-
Give a name to the profile along with a brief description, and select the configurations to specify the values.
-
Click Save. Your custom profile will appear under the list of custom profiles as shown below.


Once you create a profile, attach it to the intended applications, or else the default profile will remain applied.
-
Go to the Applications tab.
-
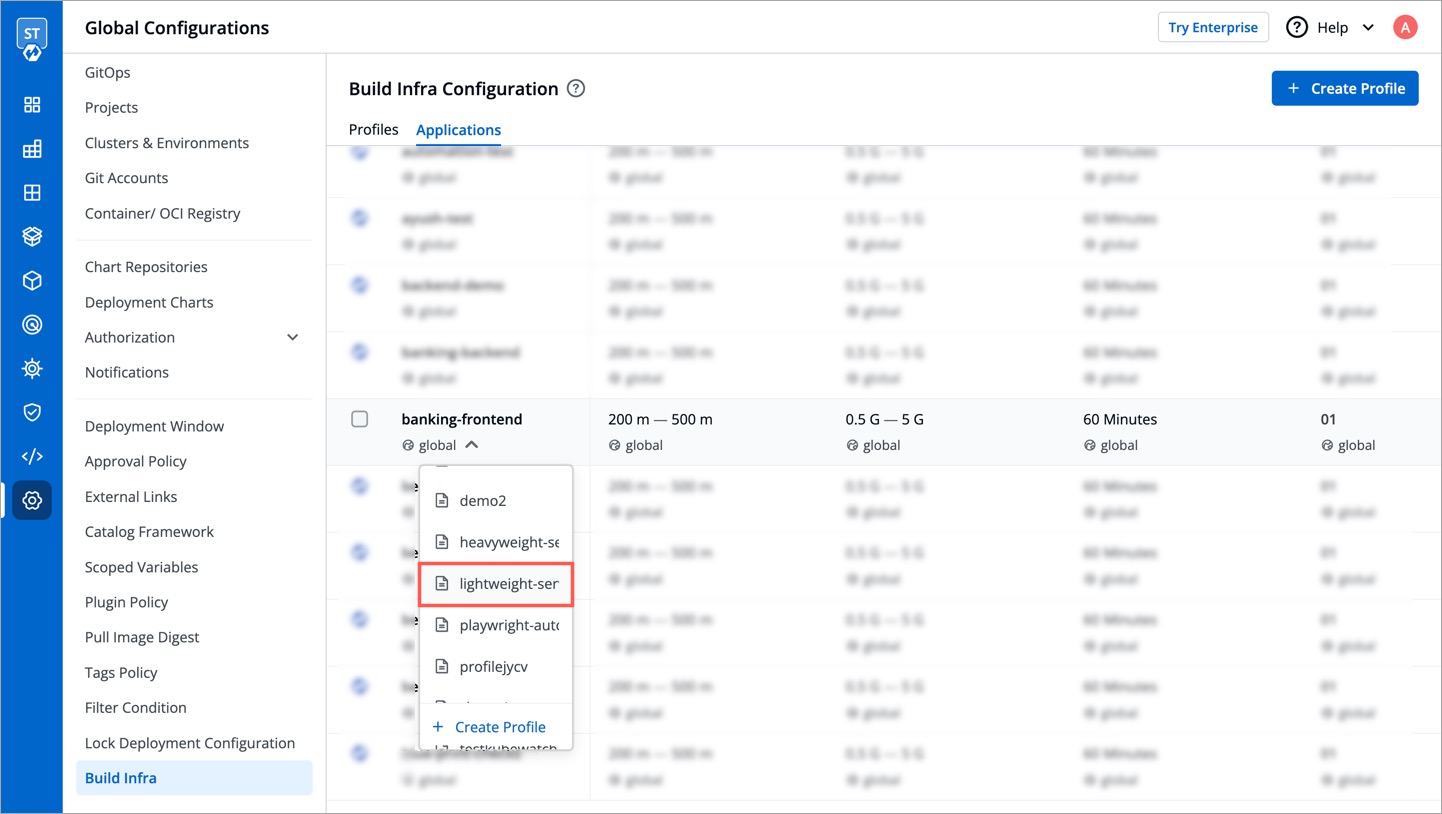
Choose an application and click the dropdown below it.
-
Choose the profile you wish to apply from the dropdown.
-
Click Change to apply the profile to your application.


Tip: If you missed creating a profile but selected your application(s), you can use the 'Create Profile' button. This will quickly open a new tab for creating a profile. Once done, you can return and click the refresh icon as shown below.

If you wish to apply a profile to multiple applications at once, you can do that too.
Simply use the checkboxes to select the applications. You can do this even if there are many applications spanning multiple pages. You will see a draggable floating widget as shown below.

Select the profile you wish to apply from the dropdown and confirm the changes.

Once you apply a profile, it will show the count of applications attached to it.

You can edit or delete a custom profile using the respective icons as shown below.
If you delete a profile attached to one or more applications, the default profile will apply from the next build.

If you need extra control on the build infra configuration apart from CPU, memory, and build timeout, feel free to open a GitHub issue for us to help you.
In addition to application-level build infra profiles, you can now assign specific build infrastructure profiles at the individual CI pipeline level. This provides more granular control for scenarios where:
- Production pipelines require different build infrastructure than development pipelines
- Different build types (e.g., security scanning vs. fast builds) need specific resource configurations
- Environment-specific builds require tailored infrastructure settings
How it works:
- When creating or editing a CI pipeline, you can optionally select a specific build infra profile
- If a pipeline-level profile is selected, it takes priority over the application-level profile
- If no pipeline-level profile is specified, the system falls back to the application-level profile
- This maintains full backward compatibility with existing configurations
Use cases:
- Assign high-resource profiles to production CI pipelines while keeping development pipelines on standard resources
- Use specialized build infrastructure for pipelines that include security scanning or extensive testing
- Optimize costs by using appropriate infrastructure sizes for different types of builds
This feature allows you to define build infrastructure for all production pipelines (CI pipelines attached to production environments) while providing flexibility to pass node-level selectors for development builds as needed.
CPU resources are measured in millicore. 1000m or 1000 millicore is equal to 1 core. If a node has 4 cores, the node's CPU capacity would be represented as 4000m.
Memory is measured in bytes. You can enter memory with suffixes (E, P, T, G, M, K, and Ei, Pi, Ti, Gi, Mi, Ki).
| Symbol | Prefix | Value (Bytes) |
|---|---|---|
| m | - | 0.001 byte |
| byte | - | 1 byte |
| k | Kilo | 1,000 bytes |
| Ki | Kibi | 1,024 bytes |
| M | Mega | 1,000,000 bytes |
| Mi | Mebi | 1,048,576 bytes |
| G | Giga | 1,000,000,000 bytes |
| Gi | Gibi | 1,073,741,824 bytes |
| T | Tera | 1,000,000,000,000 bytes |
| Ti | Tebi | 1,099,511,627,776 bytes |
| P | Peta | 1,000,000,000,000,000 bytes |
| Pi | Petabi | 1,125,899,906,842,624 bytes |
| E | Exa | 1,000,000,000,000,000,000 bytes |
| Ei | Exabi | 1,152,921,504,606,846,976 bytes |
You can specify timeouts in the following units, beyond which the build process would be marked as failed:
- seconds
- minutes
- hours